
Unit testing: the pragmatic guide on where to start
So you decided to start unit testing the code in your project. You might be working alone or in a small team. If you feel uncertain about where to start, this article is for you!
I cover real questions that arise at the beginning of your testing journey. You’ll get pragmatic advice on how to get going and iterate forward more confidently, at your own pace.
So many great resources are out there to learn about testing. You can learn about many topics: the different kinds of tests (unit tests, integration tests, end-to-end tests, UI tests), how and when to run them, how to write tests with XCTest and about third-party frameworks you can use, different techniques such as TDD, how to benefit from test plans, how to leverage generated test results, and so on.
At the same time, you might feel that your code is not easily testable, you might wonder whether it’s a good time to refactor your project into a more testable architecture. You might even feel the pressure of having to commit to testing all of your code.
No surprise that figuring out where to actually start can be difficult, and even overwhelming. But the truth is, you don’t have to learn all of it beforehand.
So let me help you get started 🙌
On This Page
Start from zero, iterate
Automating the testing of a project is an iterative process. We start with no tests, then add some, bit by bit - either for existing code or along with newly written code. As the time goes, the amount of tested code grows. Eventually, a significant portion of the code becomes tested, although it usually takes a while to get there.
But what if I told you that even having zero tests brings value to your project?
That’s right. When we run a test suite with no tests, we already verify that a) the project compiles, and b) the app doesn’t crash immediately on start (though it only applies when testing apps, not frameworks).
For example, running tests before every commit saves you from accidentally committing a version that doesn’t even compile.
It only gets better from there - every new test verifies a tiny path in the code, not only for correctness of the produced result, but also that it doesn’t crash or hang the app.
Don’t worry about ramping up the testing slowly - any amount (and kind) of tests is better than none.
Configuring the project for testing
So to start benefitting from testing, all you need is to have the testing infrastructure in place. From there, you can continue learning all there is about testing, experimenting with different types of tests, and so on. Adding new tests is just a matter of adding a new test case class or a new function. We’ll cover that below.
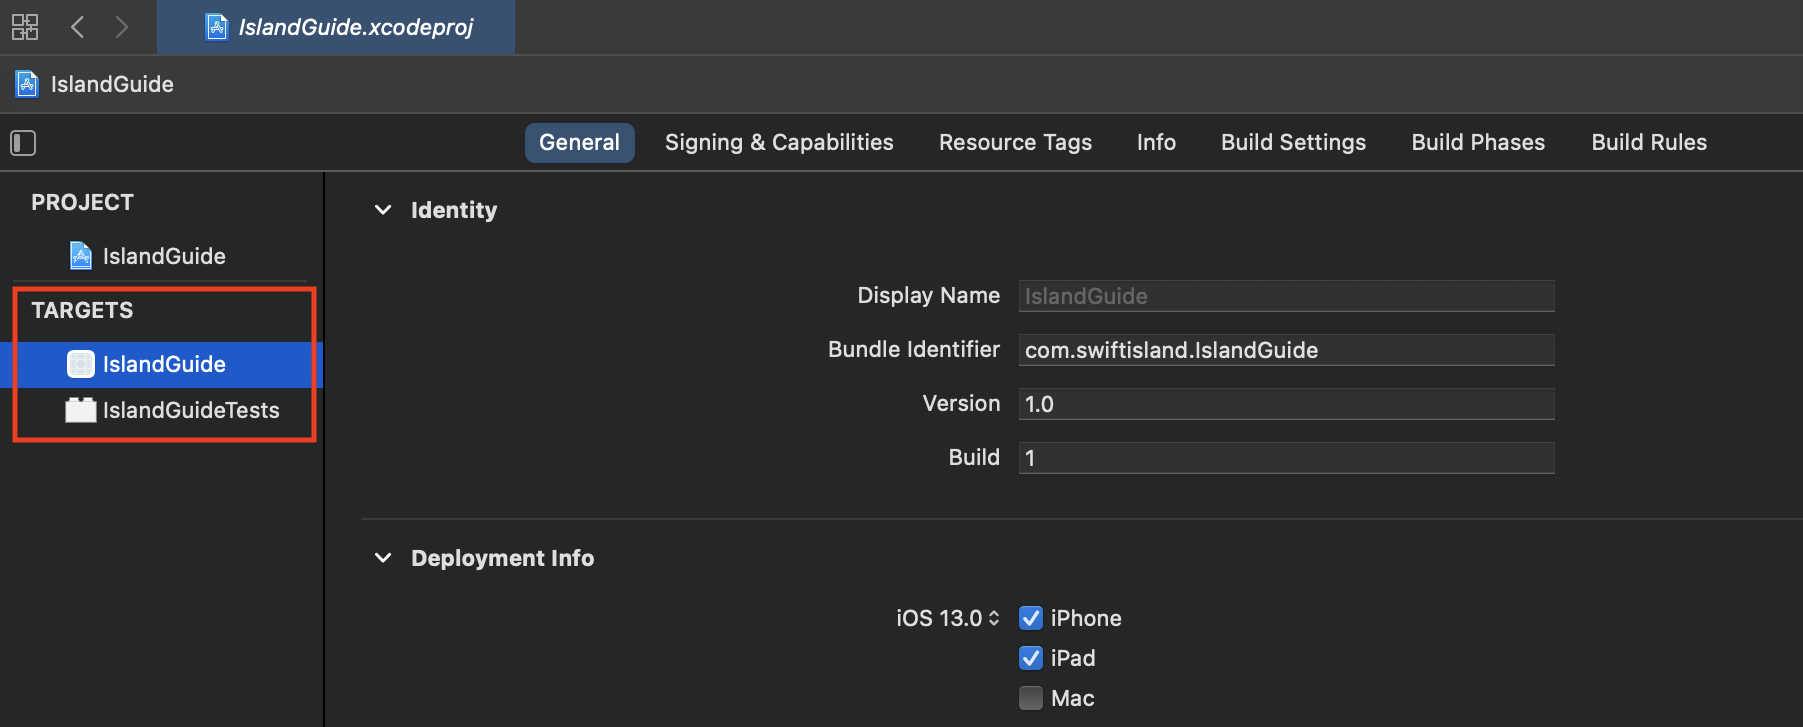
Tests are a part of the app project, but they are not part of the app itself - tests live in a separate target. A target specifies a product to build, such as an iOS, watchOS, macOS app, extension, a framework, test suite, or a UI test suite. A project can have multiple targets of each kind.
If you’re working on a framework created with Swift Package Manager, the targets are configured via the Package.swift file.
SPM frameworks can also have multiple test suites. Below we focus on configuring app projects, but if you want to learn about creating a Swift Package that includes tests, check out this article: Swift Package Manager framework creation.
Adding a test target to the project
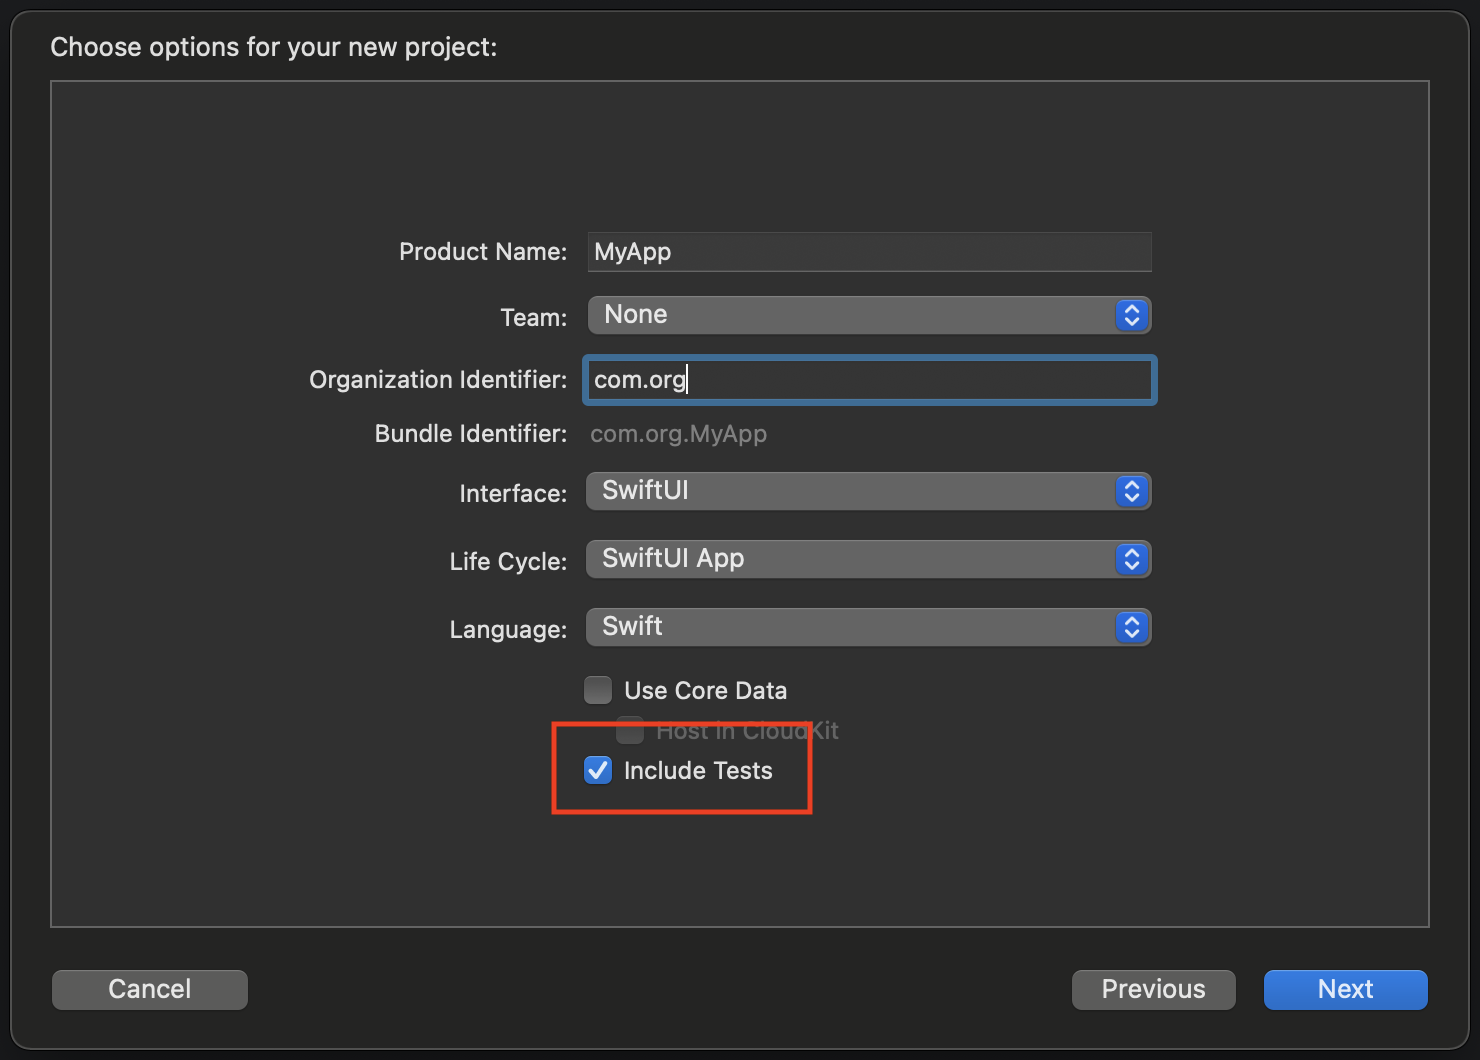
When you create a new project, enable the Include tests checkbox, so the test target gets created automatically.
If you have a pre-existing codebase, a test target can be added with just a few clicks. This free guide illustrates how to add a new test target to a project. (I have no affiliation with the paid course).
Managing a broken test target
If you already have a test target in the project, but it fails to compile, or many tests fail, there’s still a way forward. Try fixing the errors if there are only a few of them.
It could turn out that fixing the old test target is a bigger task, and you can’t afford to spend the time. In this case, my recommendation is to create a new test target in the project.
There can be multiple test targets in one project. Moving test case classes (files) between targets is easy, and you can consolidate all your tests into one target later. That shouldn’t block you from starting to add new tests now!
To prevent the newly created test target from getting abandoned and broken, make sure to keep the tests up to date and execute them regularly. Read the next section to find out how. 👇
When, where, and how to run tests
Tests can be run locally or on a remote machine. A remote machine is usually managed by a CI (continuous integration) system. The machine pulls the code from the source control system, executes the tests, and reports the results. Not all CI systems offer macOS machines, but many do: GitHub Actions, CircleCI, Bitrise, Travis CI. Some CI systems such as Jenkins let you connect your own physical machines, but it’s an advanced topic so we won’t cover it here. Soon Xcode Cloud will allow triggering the execution of tests in the cloud right from within Xcode.
There are a few ways how to run a test suite. You could run tests manually or via the command line.
A test suite can be executed via the command line with the help of the built-in xcodebuild test command or the all-powerful fastlane.
Usually, you only need to use command-line tools when executing tests remotely via a CI system.
The when also has multiple options: you can run manually on-demand (essentially whenever you remember to do it), before merging a feature branch, on each pull request (if you practice that), or even before or after every commit.
When you’re just starting out with testing, you can trigger tests manually in Xcode by using the Test action.
The optimal setup for long-running projects, even for solo developers, is to create a pull request for each merge, and to execute tests on every pull request automatically via a CI system. This way it’s easy to roll back to the last working version, and you can work on something else while the tests are running in the cloud. If you’re already hosting your code on GitHub, GitHub Actions is the easiest choice.
If learning how to configure a CI system is not on the top of your priorities (which is totally fine), I recommend running tests locally before pushing your changes to remote or at least before merging a branch.
To get started with GitHub Actions, I recommend this beginner-friendly short setup guide: Creating Basic GitHub Actions For Testing with Xcode.
Is it testing or unit testing?
The term testing describes the process of verifying the correctness of software. Then we distinguish between automated testing and manual testing.
Unit tests are the kind of automated tests that verify the correctness of the implementation of individual units of code - such as classes, structs, or functions. If we only have unit tests, we have to trust that the units are put together correctly to make a functioning app.
Integration tests verify that units work together correctly. End-to-end tests are even more high-level automated tests that verify the system as a whole, including server-side connection. UI tests verify the app’s interface.
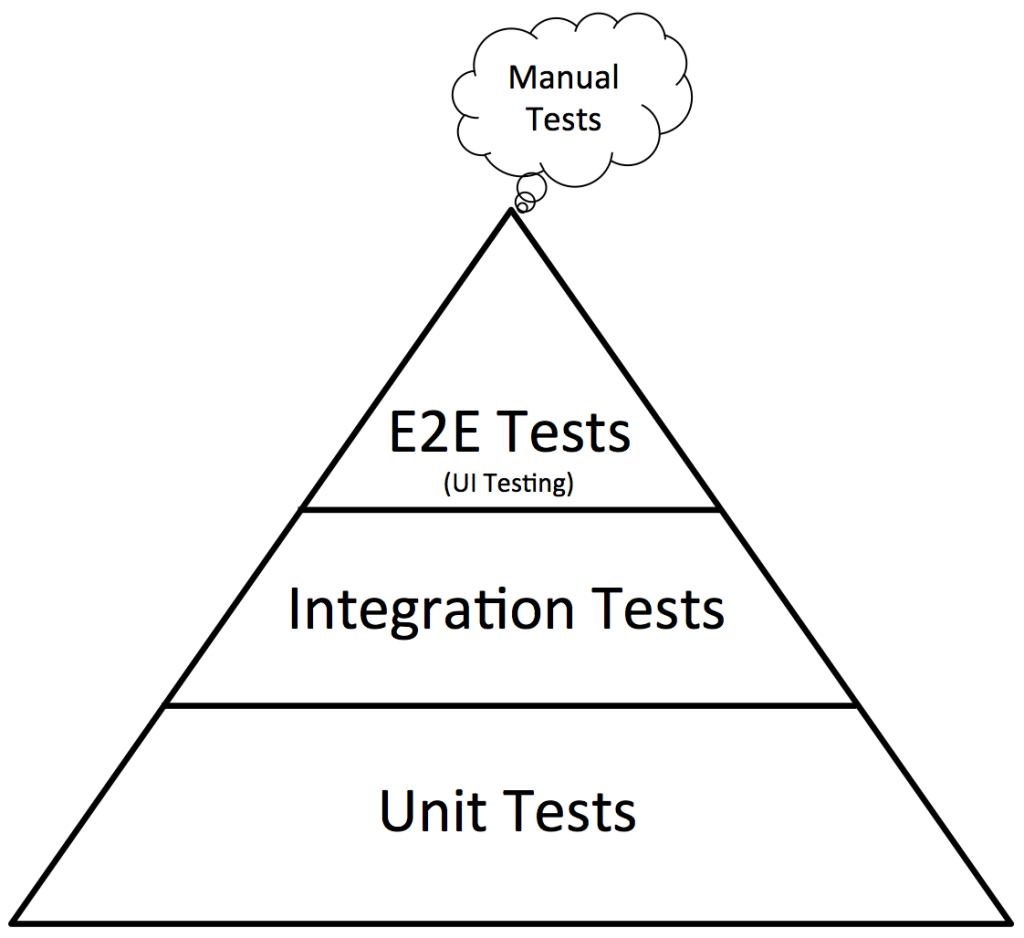
This is what’s called The Testing Pyramid. (image credit: Ministry of Testing)
We write all of these four test types with the XCTest framework by creating XCTestCase subclasses.
Writing UI tests requires us to use a special XCUIApplication API to interact with the app itself, but the rest of the test types are coded the same way. The distinction is very semantic: depending on which part of your code you are testing, you call it a unit, integration, or an end-to-end test.
Unit tests are small, and a test target usually has many of them. Most often, unit tests comprise the majority of the test suite. Because of that, the words testing and unit testing are sometimes used interchangeably.
If you want to read more about these different kinds of tests, check out Apple’s guide on Testing Your Apps in Xcode.
To learn more about writing assertions with XCTest, XCTest documentation page is a great starting point.
Do we have to TDD?
TDD (Test Driven Development) is a methodology that is commonly associated with unit testing. TDD dictates that we should write the tests before writing the implementation.
Some people believe TDD is the one true way to write tests. However, in reality, everyone’s brains are wired differently. Coding is a very creative process, and different people prefer different ways of getting to the same result. Most developers who practice testing don’t actually follow TDD most of the time.
Let me offer a simple rule of thumb: if you want your code to be covered by tests, commit to the outcome of having code paired with tests. How you get to that point is a personal preference. If you practice pull requests, especially in a team, you could commit to having tests included in each PR along with the code.
To decide when to write tests, try different approaches and figure out what works best for you. You can sketch a draft of the feature implementation in the playground, or write/rewrite your code as many times as you like, and write tests when you feel done with the feature. Or write tests first against a skeleton of the implementation, and fill in the actual logic to make the tests pass.
Treat methodologies and patterns as inspiration, and find what works best for your flow, your team, and your project.
If you want to learn more about the fundamentals of TDD, I find this article from IBM to be a good resource: Test-driven Development.
Picking what to test
Many articles out there will tell you which areas of the codebase you should test. But do you have to commit to unit testing everything that you should?
Absolutely no. Having some tests is better than having none, as we discussed above. You can limit the scope of your testing efforts based on your preference, priorities, and deadlines.
Here are my 3 tips on how to find areas to focus on for the testing efforts:
-
logic that is critical to your app
-
less critical but obscure logic where it’s hard to notice if it breaks
-
areas where it’s time-consuming or tricky to test all edge cases manually
Examples of such areas are: deserializing (parsing) server responses, date arithmetics, custom sorting/filtering logic, saving and reading back user’s local data.
Testing the untestable
Most of the commonly used patterns and architectures are well suited for unit testing, and refactoring will make writing tests easier. Such patterns as MVVM, MVP, and Dependency Injection were designed with testability in mind. But to start with unit testing, you absolutely don’t have to do any major refactoring.
Here’s an approach that always works regardless of how untestable you think your code is:
-
Extract the piece of code into a completely separate helper function in a helper class. This way, the code becomes pure: pure code has no side effects, uses only passed in parameters, and returns the result. Pure code doesn’t use singletons or global variables.
-
Call the new function with one line where the original code used to be.
-
The new helper function can be unit-tested.
Even though the rest of the code would still not be covered by tests, you can test the extracted function. Sure, you can still call the function in a way that causes a bug, but you made it less likely.
Here’s an example. Let’s say we have a view controller class with a piece of logic we want to test:
class MyViewController: UIViewController {
    // ...
    private func sortData() {
        self.data = self.data.sorted({.......}) // complex sorting logic here
    }
    // ...
}
You can extract this piece of logic into a separate, pure function, and test that function:
class MyViewController: UIViewController {
    // ...
    private func sortData() {
        self.data = MyViewControllerHelper.sortData(self.data)
    }
    // ...
}

final class MyViewControllerHelper {
    static func sortData(_ data: [MyObject]) -> [MyObject] {
         return data.sorted({......}) // complex sorting logic here
    }
}

/// In tests:
class MyViewControllerHelperTests: XCTestCase {
    func test_sortDataTrivial() {
        XCTAssertEqual(MyViewControllerHelper.sortData([]), [])
    }
    func test_sortData() {
        let result = MyViewControllerHelper.sortData([MyObject(value: 1), MyObject(value: 3), MyObject(value: 2)])
        XCTAssertEqual(result, [MyObject(value: 1), MyObject(value: 2), MyObject(value: 3)])
    }
    // ...
}
How many bugs can sneak in when calling self.data = MyViewControllerHelper.sortData(self.data) ? Not many.
At the same time, we can be sure that the sorting logic works as expected.
Later on, you could turn the helper into a view model (shall you go with MVVM). If you’re comfortable enough with MVVM already, go with it right away - that’s a great way to improve testability and your app’s architecture at the same time. But if you’re not ready to make a major refactoring - you still have a way to start testing your code.
Wrapping up
Stepping into unknown territory can be overwhelming. There’s enough to learn about automated testing as it is: from different assert APIs to improving app architecture to configuring CI systems.
This article covered setting up testing infrastructure, picking what to test, figuring out if TDD is for you, understanding the difference between different kinds of tests, and approaching seemingly untestable code. Missing a good resource on a topic? Ask me on Twitter!
I hope my advice sets you on a path where you feel more confident with testing your apps 💚
Thanks for reading. I hope you enjoyed the post 🙌
To get notified about new posts, follow me on Twitter or subscribe to the feed.
If you enjoy my writing, consider subscribing to iOS Code Review newsletter where I curate the best code improvement content from the community.
This post is licensed under CC BY NC SA 4.0 by the author.